This is a continuation from yesterday's Warhammer 40k Battle Report. If you haven't read it yet, please skip down to the first Warhammer 40k post.

Movement Phase: Player 2
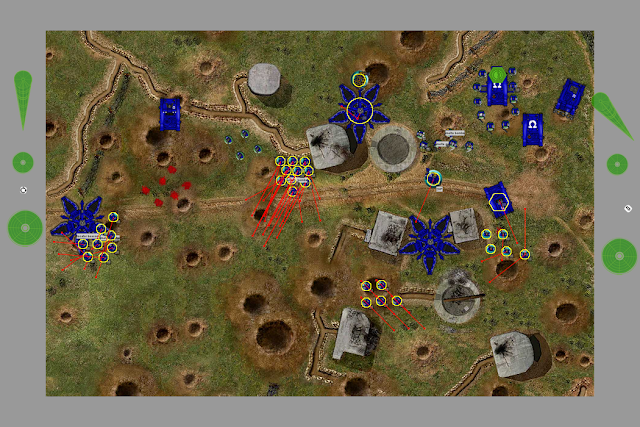
Here is Player 2's movement phase. As you can see from the red movement trails, the scouts to the west have chosen to retreat after losing over half their squad. The Captain and Command Squad have advanced forward down the center. One Rhino and a Vindicator tank moved down the right side of the table. Because every crater on this map is difficult terrain, and Vehicles treat all difficult terrain as dangerous terrain, these tanks have to roll a D6 every time they move over a crater. One Rhino wasn't as lucky as the other, and it is now immobilized after rolling a 1. The tactical space marine squad on board had to disembark and continue on foot.

Shooting Phase: Player 2
Player 2 had an effective shooting phase! To the west, the Whirlwind tank unleashed a volley of missiles on the Space Marine squad next to the drop pod. One was killed, the rest being saved by armor. The scout squad also opened fire with their sniper rifles, but did no damage. In the center, one Command Squad Veteran fired his melta gun, scoring a lucky penetrating hit on the Dreadnought. Its right arm was destroyed, and it reduced to 2 hull points remaining. Finally, Player 1's scout squad to the east suffered a withering barrage of bolter fire and Demolisher Cannon fire from the nearby tactical marines, Rhino and Vindicator Tank. Only one scout was killed, though. Because nothing is in assault range, the assault phase is skipped and we move on to Turn 2. Also, note that the forgotten marine command squad has arrived at the bottom of the table.
Turn 2: Player 1 - Movement
A lot happened this movement phase! Before movement even began, Player 1 rolled for reserves and successfully got higher than a 3, dropping his Ironclad Dreadnought to the north. He also successfully deep-striked his Assault Marine squad, who are able to descend onto the battlefield using jump-packs. The tactical marines to the west advanced forward, looking to take out the dangerous Whirlwind tank before too much damage could be done. The marine squad moved through the center in the middle of the table, while the Dreadnought advanced toward the Command Squad and the enemy Captain. To the east, Player 1's Rhino moved forward while the scout squad re-positioned, looking to find a good distance for their sniper rifles. The Librarian continued advancing, trying to get within range of the fighting.

Shooting Phase: Player 1
Not the most successful shooting phase for Player 1. To the west, a hail of boltgun fire from the tactical marines and assault marines killed three scouts, routing the remaining scout as his morale broke. The two Dreadnoughts, the scouts, and the Razorback - as well as a marine inside with a flamer - all fired onto the hardy Command Squad; not one fell.

Assault Phase: Player 1
Finally, our first Assault Phase! The Dreadnought has rushed toward the Command Squad and attacked in close combat. With 3 attacks and a powerful Dreadnought melee weapon, it managed to crush one of the enemy Veterans, but only one. The enemy was unable to do any damage to the Dreadnought's thick hull. Although Player 1 had the option to retreat his squad and automatically fail the morale check (using the Combat Tactics special rule allotted to Space Marines), he chose to continue the combat into the next turn.

Movement Phase: Player 2
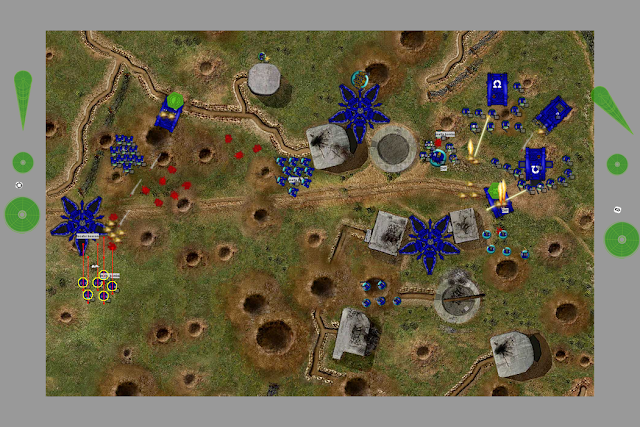
Player 2 continues his sweeping advance. To the west, he has managed to deploy a reserve force of Assault Marines, deep-striking onto the battlefield. Behind them, the Whirlwind tank has been retreating from the dangerous force of tactical marines advancing on it. In doing so, it ran over a trench, becoming immobilized (it rolled a 1 on a dangerous terrain test). The lone remaining scout has regrouped, moving around the bunker to gain line of sight with the enemy Ironclad Dreadnought. Also note that the formerly-immobilized Rhino to the east has repaired itself, as Rhinos are able to do, by rolling a very lucky 6. Finally, All the space marines advanced down the eastern field, looking to assault the hapless scouts there.
Shooting Phase: Player 2
A very successful shooting phase indeed! The Whirlwind to the west is the hero of the day, with a good barrage of missiles killing two enemy marines and causing them to retreat. To the east, a Melta Gun marine has managed to destroy the heavy bolters on the enemy Razorback. Other shots were taken but ultimately missed or deflected by armor.
Assault Phase: Player 2
An Assault Phase did occur this turn, but I have no screenshot of it. We'll see the result next turn, but briefly, the Dreadnought killed one Command Squad Veteren (the valuable Apothacary!), before the Space Marine Captain planted a melta bomb onto the Dreadnought, wrecking it completely.
No comments:
Post a Comment