 |
| Dark Angels Deathwing Army |
 |
| Tau Mech Army |
To the left is my Dark Angels army. It's a balanced Deathwing army consisting of three units of Deathwing Terminators with Belial and an Apothecary, two units of Ravenwing Bikers (I forgot to add the second at the beginning of the game. They'll show up early in the game when I remembered them!), and a Dreadnought with Plasma Cannon and Missile Launcher in a Drop Pod. The Terminators are equipped mainly for shooting. The Ravenwing Bikers are in the list to provide a teleport homer for a Deathwing Assaault. This army is very slow, and small, but quite powerful.
To the right is my Tau army. It's a balanced army making use of a ton of firepower and mobility, with a good number of vehicles. I have a Shas'el Crisis Team outfitted in fireknife configuration, and a normal Crisis Team outfitted as a mixture of Fireknife and a Fusion blaster with target lock on the team leader. There are two 12-man Firewarrior squads with devilfish transports. I have a squadron of three Piranha skimmers, one with fusion blaster and target lock. My heavy support consists of a Hammerhead and two Broadsides.
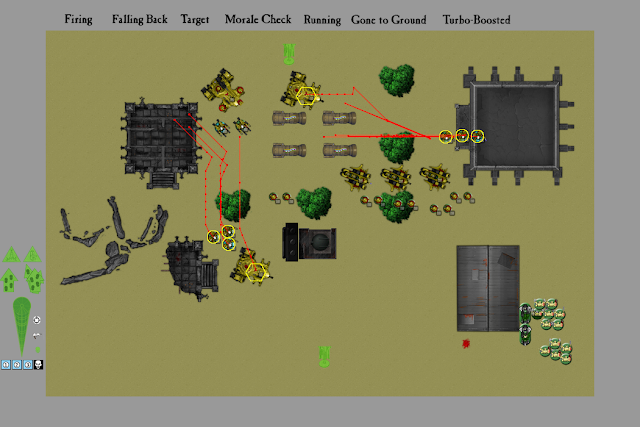
The Map
I elected to make a custom map for today's battle. There are some ruins and trees that confer 5+ cover saves. I decided that the generators at the top are short enough that battlesuits and dreadnoughts can fire over them, but not infantry. There are enough obstacles for units to hide behind if necessary, but also enough line of sight for a shooty army like the Tau to do a lot of damage, in a good position.
The mission rolled was The Emperor's Will, where two objectives are placed on either side of the table, each worth three Victory Points. I actually wasn't very clear on this particular mission until I read it in more detail. Until near the end of this game, I thought you only got points from capturing the enemy's objective, not the one near to you. In reality, either objective grants either army three Victory Points.
The first turn is also night fighting, although it made no difference in this game.
Deployment

The Tau won the roll-off, and elected to deploy first. While in general, I prefer deploying second with Tau, on this map and against this Dark Angels army I think deploying first was best. The Dark Angels are going to employ a Deathwing Assault, deep-striking most of their terminators in on the first turn. Because of this, I didn't want to let the Bikers deploy far into the center of the map and allow the Terminators to deep strike halfway toward the Tau army. By deploying first, I ensure that the middle of the map is far more dangerous for the Dark Angels, driving them into a more conservative deployment and gaining the Tau some time.
The Dark Angels left every part of the army in reserve except the Bikers. Again, there should be a second Biker Squad, but I forgot it. I'll remember it soon! I deployed the bikes back here because it's the only reliable cover they can have against the Tau's first turn shooting. I think I could have deployed them farther to the right of this warehouse, and then used their scout move to get the Terminators up a little faster. As it happened, I forgot about their scout move too.
Turn 1 - Tau Movement

Tau can't really get any shots off this turn, so they decide to move Piranhas and Devilfish forward to block and screen. All gun pods disembark from the vehicles as well, moving forward to form a skirmish line.
Turn 1 - Dark Angels Deep Strike

A Hammerhead had some line of sight with a Ravenwing Biker, and killed it with a railgun shot, despite a cover save.
Two Deathwing Terminators deep strike within the range of the Teleport Homers equipped to the Bikers. They'd have been better off deploying normally, without the scout-move of the Bikers.
Turn 1 - Dark Angels Movement

The Bikers moved up. Pretty straightforward!
Turn 2 - Tau Movement

Seeing that the Dark Angels deployed far to the east, the main fire base of the Tau army moves away, to keep distance from the dangerous Terminators. The more mobile skirmishers, the gun drones, Piranhas and Crisis suits, advance forward to target or block the choke point from which the Terminators must pass to get at the objective.
Turn 2 - Tau Shooting and Assault
Nothing was in line of sight for the Tau to shoot. The Devilfish moved Flat Out, while the Crisis Suits made jet pack movements.
Turn 2 - Dark Angels Deep Strike

The Dreadnought deep strikes onto the battlefield to defend the close objective. With the ability to charge in close combat, and two potent anti-vehicle weapons, it's a dangerous foe for the Devilfish or Piranhas currently in mid-field.
Turn 2 and 3 - Dark Angels and Tau Movement

On the right, the Dark Angels moved forward. I added the forgotten Bike Squad, finally, to the rear.
In Turn 3, the Tau moved into a strong position. The Hammerhead and Broadsides moved to cover the choke point between the warehouse and the northeast building. Gun drones moved forward in a wide line to block movement and stall the Space Marines. Piranhas moved to cover the choke point as well, but the skimmer equipped with a fusion blaster turned to face the rear armor of the Dreadnought, in melta range. Crisis Suits moved into ruins to the west and onto a rooftop to the east, ready to deal some damage to the armored foes. One Devilfish disembarked its Firewarriors, preparing to capture the objective. The second Devilfish arrives in mid-field, adding to the defense of the vital choke point but still within reach of the near objective.
Turn 3 - Tau Shooting

Crisis Suits fired at the Ravenwing Bikers, killing one, and the Piranhas finish off the unit. The Tau earn a Victory Point for First Blood. The third Piranha, with the fusion blaster, fires at the rear armor of the Dreadnought, but misses the crucial shot. The Shas'el Crisis Team to the west fires at the drop pod, dealing two glancing hits. Finally, one Broadside has line of sight with a Terminator and kills one with a well-placed rail shot.
Turn 3 - Dark Angels Deep Strike

That's right, more deep striking! Last one, I promise! The final squad of Deathwing Terminators arrives, looking to contest the southern objective.
Turn 3 - Dark Angels movement

The Terminators advanced forward steadily, while the Dreadnought moved close to the Piranha.
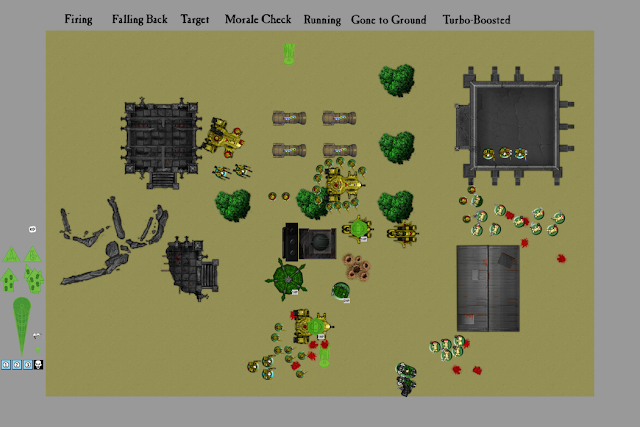
Turn 3 and 4 - Dark Angels and Tau Movement

Dark Angels Terminators shot at the gun drones, killing most of them. The Dreadnought shot at the Piranha, exploding it with a well placed plasma cannon and missile shot. Cyclone Missiles killed a Firewarrior, while the Terminators to the east wounded a few Crisis Suits with an Assault Cannon. The Dreadnought charges the rest of the Piranha squadron, scoring a penetrating hit and stunning a Piranha.
During the Tau turn, Firewarriors disembarked from the Devilfish in midfield, ready to concentrate fire at the enemy Terminators. Meanwhile, the Firewarriors moved to claim the southern objective, identifying it as a Targeting Array, which permits them to re-roll To-Hit rolls of one.
Turn 4 - Tau Shooting

Despite their bonus, Firewarriors failed to wound any bikers they shoot at. The Shas'el Crisis Team, however, is lucker, and kills two of them. The other Crisis Team manages to kill a Terminator with a fusion blaster shot, penetrating his armor. The Piranhas fired but did no damage to the Terminators.
Turn 4 - Dark Angels Movement

The Dark Angels advanced forward yet again, pushing relentlessly toward the objective.
Turn 4 - Dark Angels Shooting
The Dreadnought fired its Plasma Cannon at the Devilfish, but the cannon Got Hot! The shot failed. It was able to inflict a glancing hit with a missile launcher, though. The Bikers fired a multimelta at the same Devilfish, causing a penetrating hit and stunning the crew. The Terminators fire at the Firewarriors, killing a number of them with bolters. To the east, the Terminators fire at the Crisis Suits, but cause no damage. They elect NOT to fire on the gun drones, because of the rule that prevents a unit from charging if it fired at a different unit. Shooting at the gun drones would surely kill them before the Terminators got a chance to charge at anything. They would much rather wait, charge the gun drones and kill them in assault, and then make a consolidate move to get closer to the Tau.
Turn 4 - Dark Angels Charge

The Dark Angels charge! A Dreadnought charges the Devilfish while Belial's Deathwing Terminators charge at the gun drones.
Turn 4 - Dark Angels Assault

The Dreadnought wrecks the Devilfish while the Terminators easily kill the gun drones, getting a consolidate move forward as planned.
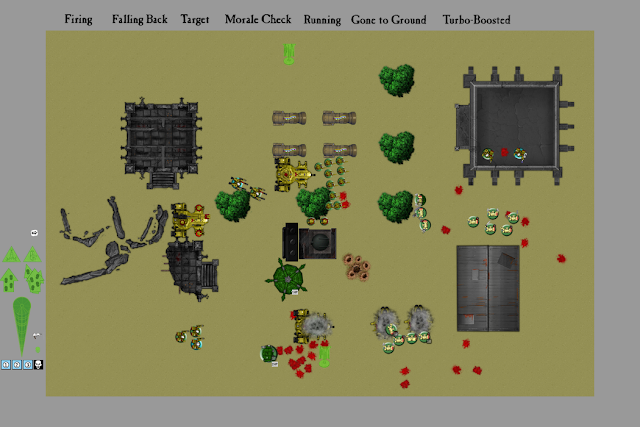
Turn 5 - Tau Movement

The stunned effect expired on the Piranha, letting it close into range with the Terminators and Bikers, blocking their path somewhat. The Firewarriors in midfield moved into formation to fire on Belial's Deathwing Terminators, as did the Hammerhead Gunship.
Turn 5 - Tau Shooting

The Shas'el has line of sight with the Bikers, and fires a plasma rifle. They're saved by Jinking. The Shas'el's missiles do manage to hit them, killing one. Piranhas finish them off. The Firewarriors in midfield land 10 shots on Belial's Deathwing Terminator squad. All of them are saved by armor or by Feel No Pain. A lucky little gun drone, however, manages to land a single shot, and kills a Terminator! Clearly, this drone deserves a promotion! Finally, a Crisis Suit kills a Terminator with a missile, although all plasma rifle shots are saved by Feel No Pain.
Turn 5 - Dark Angels Movement

The Terminator Squads advance forward yet again. The Dreadnought moves around the wreck of the Devilfish to threaten the Firewarriors and deny the objective.
Turn 5 - Dark Angels Shooting

The Dreadnought makes short work of the Firewarriors between Plasma Cannon and Missile Launcher shots. The Terminators open fire on Firewarriors, killing two; and Crisis Suits, killing one.
Turn 5 - Dark Angels Charge

The Dreadnought charges the Firewarriors in close combat, while the Terminators charge the Piranhas.
Turn 5 - Dark Angels Assault
The Terminators wreck both Piranhas easily.
The Dreadnought actually does no damage to the lucky squad of Firewarriors. They elect, however, to flee from combat using the Our Weapons are Useless rule. Not so luckily, they are killed by the Dreadnought's sweeping advance.
Turn 6 - Tau Movement

With the southern objective stolen, and the game nearly over, the Tau turn their attention toward the northern one. It was around this point I realized you could control either, or I think I'd have gone for the northern objective sooner with Tau. Regardless, Firewarriors embark onto the Devilfish and head toward it at cruise speed. Every other Tau unit moved north to assist and cover.
Turn 6 - Tau Shooting

Broadsides fire their powerful railguns at Belial's Terminator Squad. A railgun shot made it through a Terminator's formidable armor to kill him, as he nobly saved Belial with a Look Out Sir! The Hammerhead similarly targets the enemy Warlord, but the Apothecary uses Look Out Sir and makes his invulnerable save, surviving. The Crisis Team fires on Belial as well, and the Apothecary again uses Look Out Sir, but this time fails his invulnerable save as well as Feel No Pain, and dies. Finally, the Shas'el and his Crisis Team fire on the Dreadnought, wrecking it.
Turn 6 - Dark Angels Movement

The Dark Angels Terminators advance toward each objective, seizing the southern one. Belial joins another unit.
Turn 6 - Dark Angels Shooting

No damage is done.
I rolled a 1 and the game ended here.
The Tau earned: Linebreaker; First Blood: 2 Victory Points.
The Dark Angels earned: Primary Objective: 3 Victory Points.
And the Dark Angels are victorious in an extremely close game! A single dice roll could easily have changed this result, not to mention the number of errors on my part!
The game was so close, in fact, that I decided to find out just what would have happened had it continued to a seventh turn...
Turn 7 - Tau Movement

Firewarriors disembark, seizing the northern objective. The Devilfish moves aside to give them a clear firing lane.
Turn 7 - Tau Shooting

Broadsides, Crisis Suits and the Hammerhead shoot into the Terminator squad, killing all of them including Belial! Tau gain the Slay the Warlord objective.
Turn 7 - Dark Angels Movement

The Terminators move forward. Their only hope is to kill the Shas'el Crisis Team, leading to a drawn game.
Turn 7 - Dark Angels Shooting

Although one Crisis Suit is killed by a Krak missile, the Commander survives, and the game ends.
The Tau earned: Linebreaker, First Blood, Slay the Warlord, and a Primary Objective: 6 Victory Points.
The Dark Angels earned: a Primary Objective: 3 Victory Points.
Tau win! Clearly this game could have gone either way, as the Tau could have won a nailbiting victory in the seventh turn. Lucky for the Dark Angels that the game ended earlier!
Thanks so much for reading, and stay tuned to this blog for more battle reports, including online games as soon as I can find people to play with!


