I'm learning how to play Warhammer 40k. It's a brilliant strategy game with some awesome backstory and literature. I'm recording every turn and most specific actions during my current game, in order to share it with you, the reader!
My plan is to have two paragraphs accompany every screenshot: The first will explain what's happening in respect to the game, rules and strategy of Warhammer 40k the game; the second will narrate the battle itself, like a story, from a 3rd person omniscient perspective. Hope you enjoy!

Deployment.
Before a game can begin, there are a few steps to take. The first is selecting the mission parameters. For the purposes of simplicity and learning, I chose the simplest mission: "Purge the Alien." In this mission, you gain Victory Points for destroying entire units of the enemy (single models don't count). Once the mission is selected (or rolled for), it's time to deploy the troops. In this game, each side (hereafter referred to as Player 1 and Player 2) elected to keep some troops in reserve to Deep Strike onto the battlefield on later turns. Player 1 had several drop pods for a Drop Pod Assault, as we'll see soon. The units that can go onto the battlefield deploy in the green deployment zones on the player's side of the table. The table itself affords a lot of cover and difficult terrain, making it difficult for most vehicles. It includes buildings, trenches and craters, all of which can be used for cover. For simplicity I will probably ignore buildings in this game, treating them as impassible terrain. Ordinarily you can enter buildings.
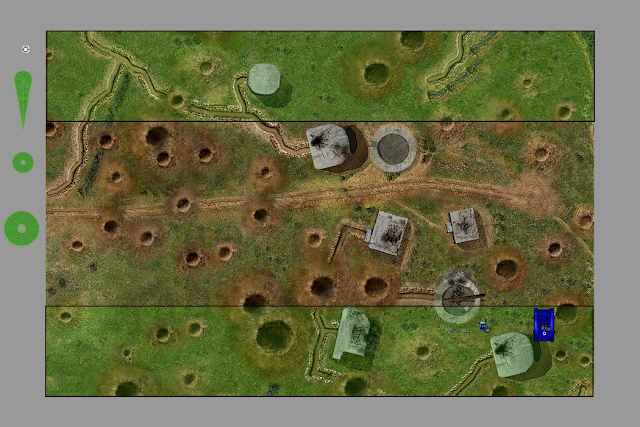
Player 1 is deploying first, after player 2 won the roll-off but decided to go second on purpose. Player 1 has deployed his Warmaster, The Librarian, behind the cover of buildings on the east. The Librarian is a powerful Psyker with strong spells. Alongside the Librarian is a Razorback transport, carrying a 5-marine tactical combat squad. Player 1 has split up his 10-marine tactical squad into two 5-man combat squads before deployment; a special ability of the space marines. The Razorback is a transport emphasizing firepower at the cost of reduced infantry capacity, perfect for a smaller combat squad. Player 1 elected to deploy to the east because of the drop pod assault that is coming shortly; the west provided too many open spaces, and he wants a close and dirty assault. Note that Player 1 has made a mistake here: he has one combat squad of 5 tactical marines that did not deploy, and must. He'll correct that later, but for now consider them in reserves too (although this violates the rules).

Deployment is now complete. Player 2 deployed two fully loaded Rhino transports with 10-marine tactical squads in each to the northeast. In the far east corner is a Vindicator tank, armed with a powerful demolisher cannon hoping to deal lots of damage as Player 1's army advances. Next to the Rhinos stands the Space Marine Captain and his unit of Command Squad veterans. He elected to begin the game attached to their unit. The Captain is a strong hero character with an Iron Halo, conferring a 4+ invulnerable save, and equipped with lightning claws and melta bombs, making him formidable in close combat against any adversary. He can also be wounded 3 times before dying, keeping him alive far longer than normal infantry. The Command Squad he has joined is fairly normal infantry, with strong close combat weapons and an Apothacary attached to the unit. The Apothacary is a medic, granting a "feel no pain" bonus which can save soldiers from wounds on a roll of 5 or higher. On the left side of the battlefield, Player 2 has deployed a Whirlwind tank, a long range barrage ordnance unit designed to deal massive splash damage to infantry.
Finally, after normal deployment, each army contains a squad of scout marines. These troops have the "infiltrate" special rule, which allows them to deploy after the main armies, and anyplace on the battlefield out of range or sight of the enemy. You'll see Player 1's scout squad behind a building in the center, while Player 2's scouts have deployed to the west to defend the Whirlwind.

Turn 1: Player 1
Before the movement phase, Player 1 gets to deploy his drop pod reserves in a special move called a "Drop Pod Assault". One half of the drop pods in his army automatically deep strike onto the battlefield at the beginning of turn 1, rather than later on in the game. Because Player 1 created his army with 3 drop pods, and he gets to round up when he takes half his drop pods, he actually gets 2 out of his 3 drop pods on turn one (1/2 of 3 is 1.5, which rounds up to 2!) He dropped a squad of tactical marines on the western edge of the board, hoping to catch the Whirlwind and scout squad in close range and quickly annihilate them. He dropped his dreadnought into the middle of the battlefield, letting it take the spearhead of the frontal assault. These units can move and shoot after disembarking from their drop pods, but they can not assault this turn.

Movement Phase: Player 1
The first phase of a turn is the Movement Phase. The default movement distance of each unit is six inches during this phase. Note that the tactical marines to the west retreated a bit, using the drop pod as cover, because they want to avoid an assault right now without the advantage of charging. The scout squad to the east moved around the building to take aim at the enemy Command Squad with their sniper rifles. Player 1's Razorback also advanced, but at cruising speed, traveling 12 inches. Because of its high speed, the Razorback's fire will be wildly inaccurate if it chooses to shoot. Player 1 wants to get that Razorback into the enemy's face quickly, because one space marine embarked on it has a flamer, which could do serious damage in close range. Finally, the Librarian has moved up, but at the back of the army he won't be able to do much at this point.

Shooting Phase: Player 1
To start the shooting phase, we'll step through a few individual units as they fire at the enemy. To begin with, the tactical marines to the west have opened fire on the enemy scout squad. To shoot at the enemy, they first had to check their range. Within 12 inches, the marines can fire a single round from a bolt pistol or two rounds from the rapid-fire boltgun. Between 12 and 24 inches away, the marines can only fire a single shot, and only from their boltguns. Once figuring out exactly how many shots the unit of space marines can fire at the unit of scouts, we need to work out how many shots actually hit. Player 1 took a die for each shot fired and rolled. Because the space marines have a Ballistic Skill of 4, we get a hit on rolls of 3 or higher (the trick is to subtract the Ballistic Skill from 7 to get this number. a BS of 3 would be a 4+ to hit, etc). Once determining how many shots actually hit their targets, Player 1 then rolls to determine whether the shots cause any wounds. This is done by comparing the Strength of the attacking weapon with the Toughness of the target. Equal values yield a dice roll of 4 or higher to wound. If Strength is one higher than Toughness (e.g., S 5 vs T 4) then the dice roll needs a 3+ to wound. If Strength is two higher, or more, than Toughness, only a 2+ is needed to wound. And the opposite is true: if Toughness is higher than Strength, you might need a 5+ or even a 6+ to wound particularly hardy targets. At this point, the tactical marines have a group of wounds pooled up against the scouts. The last thing to do is determine any saves. The scouts have weak Carapace Armor, so they get an armor save on a 4 or higher for every wound in the wound pool. As you can see, a total of six scouts were killed by bolter fire - a particularly lucky roll for the space marines!

Next, the Dreadnought in the center of the map fired on the enemy Command Squad. A Dreadnought has two arms with a weapon mounted on each: a Storm Bolter, a bolter assault rifle capable of firing twice at any enemy within range; and a multi-melta, a medium-range weapon that melts anything in its path and is particularly effective against armor. Unfortunately for Player 1, all three attacks missed, doing nothing.

Finally, the Razorback and the scout squad fired at the enemy. The Razorback moved at cruise speed, so it can only fire "snap shots", which require a 6 to be rolled to hit. Predictably, all three shots from its Heavy Bolter missed wide. The scouts fired their sniper rifles, but with a Ballistic Skill of 3, they require a 4 or better to hit. Only a handful of shots landed, and none made it through the Combat Squad's strong Power Armor, failing the 4+ To Wound rolls. As no units are in position to charge into close combat, the end of Player 1's shooting phase also signals the end of his turn completely. Next, we'll progress to Player 2's movement phase. Stay tuned!
No comments:
Post a Comment