Tuesday, September 11, 2012

Battle Report: Tau vs Black Templar Space Marines

The following is a FULL battle report for Warhammer 40k.  It's a rather short game in which I played against myself, testing out two new 1500 point army lists.  Enjoy!

Black Templar "Black Tide" Army
Tau "Kauyon" Army
                                                 

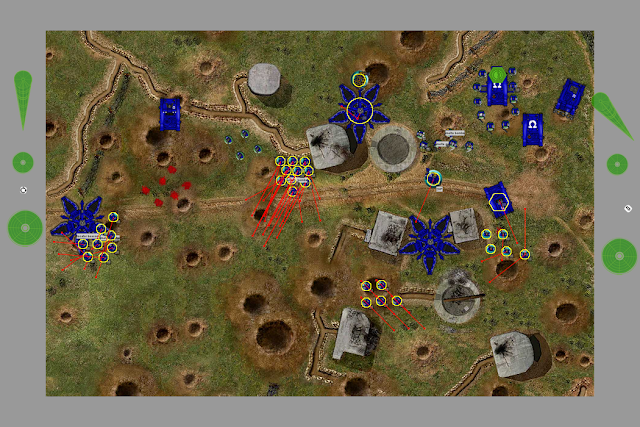
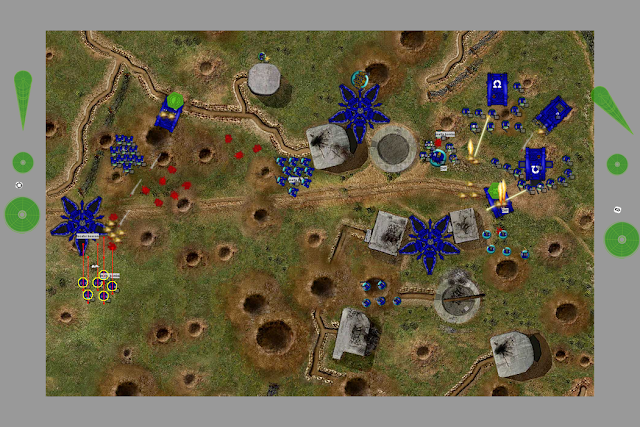
On the left, my Black Templar army.  I have two 20-man Crusade squads, one led by a Chaplain and the other led by the Emperor's Champion (with Accept Any Challenge).  They are armed with frag and krak grenades, and a mixture of bolt pistols and bolt guns.  They have no special or heavy weapons.  One Initiate in each army has a power fist.  Next, I have a 10-man Assault Squad led by another Chaplain with a jump pack.  This entire squad has melta bombs.  Finally, my single vehicle, a Predator Annihilator, equipped with a twin-linked lascannon and two side sponsons with lascannons on each, along with Power of the Machine Spirit.  Total model count is 54.  There are no transports, heavy weapons, or terminators.  The goal is to rush down the table using Righteous Zeal and kill things quickly, using the Predator to take out key targets at long range early.  This is my first attempt at a "Black Tide" army, using lots of models and tons of attacks to create something somewhat akin to an Ork "Green Tide", but with smaller numbers and higher skilled units.

On the right, my Tau army.  This is a old style army I'm trying out called a "Kauyon" army.  The goal is to use skirmish lines of Kroot, Piranhas and Gun Drones to delay the enemy advance and give the main fire base of Fire Warriors, Battlesuits and Hammerheads a full opportunity to deal maximum damage each turn.  The goal is to essentially sacrifice these front line units, but make them as annoying as possible, and make sure the enemy ends an assault on his turn so you can fire freely during yours.

I have a Shas'el Commander attached to a full Crisis team, all in Fireknife configuration (missile pods and plasma rifles).  Next is a stealth team with two marker drones, and a team leader with a markerlight and target lock.  Then, two full 12-man squads of Fire Warriors.  Then, two Kroot units with 12 Kroot Carnivores, and 4 and 5 Kroot Hounds, respectively.  There is a 3-vehicle squadron of Piranhas, all with Fusion blasters and gun pods.  For Heavy Support, I included a Hammerhead and two Broadside battlesuits, one target locked to fire at a separate target.

The Map


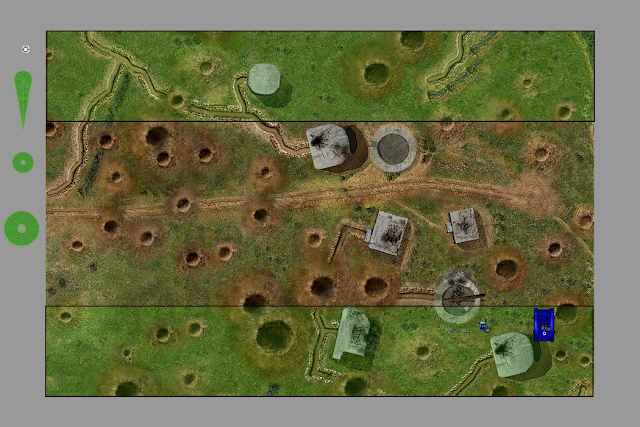
Here is the map I'll be using.  It's deep jungle, with some water and hills.  Nothing blocks line of sight nor is impassible on this map.  I am treating jungle as 5+ cover and difficult terrain.  Water is difficult terrain, but grants no cover.  Roads, of course, are open terrain.

This map presents interesting challenges as well as benefits to both armies.  The Tau have full field of view, as well as full range, to fire their weapons from turn 1.  And the forest grants the Kroot their Fieldcraft cover bonus.  But there is also nowhere for Crisis suits to hide behind, or terrain to block and slow the enemy's approach  The Black Templar can move toward the Tau at full speed, in a straight line, letting them close the distance quickly.  But they must move slowly through the difficult terrain, and they are exposed to gun fire every step of the way.

Deployment


I rolled for Warlord traits, but they never came into play during this game so I'll ignore them in this battle report.  I find they don't usually matter much.  The mission I rolled was "The Relic".  The objective sits in the middle of the map, and each army must attempt to seize it by the end of the game.

The Black Templar won the roll-off, and chose Tau to deploy first.  Tau is, I believe, at a disadvantage deploying first, as it lets them get trapped and outmaneuvered easier.  For Tau's deployment, I set up a fire base as far from the enemy as possible, with battlesuits able to take cover behind the Hammerhead, and Piranhas off to the side for harassment.  The Black Templar deployment consisted mainly of covering enough ground to charge across the map, leaving no escape route for the mobile Tau.  Note that had Tau deployed second, it could have set up a far more efficient position, perhaps splitting its forces or focusing them into a corner for better skirmish position.  Because Tau went first, they had to prepare for a multitude of deployment responses from the Black Templar.

Black Templar rolled to seize the initiative and got a 6!  They were able to both deploy second and still go first - a decided advantage, although a rare one.  Had Tau gone first, this battle report would look decidedly different, you can be sure!

Turn 1 - Black Templar Movement


Pretty simple movement phase.  Everything moved forward as much as they could.  Because I'm moving through difficult terrain, it's slow going.  The Assault Squad used their jump packs, and passed three difficult terrain tests.

Turn 1 - Black Templar Shooting

The Predator Annihilator fired twice at the Hammerhead with lascannons at full ballistic skill but did no damage.  With Power of the Machine Spirit, it then fired a snap shot at a Piranha, scoring a glancing hit, but saved by the forest cover.  The infantry squads chose to run rather than shoot, trying to get into close combat as fast as possible.

Turn 1 - Tau Movement


The Tau mobilized its skirmish line, advancing Kroot lines forward and jumping up with battlesuits.  The Piranhas have decided to move flat out and get behind the enemy lines, hoping to slow the Marines' advance.  The Tau plan right now is a delaying action.  Note that the main guns, the Firewarriors, Broadsides and Hammerhead, do not need to move much at all with this strategy.

Turn 1 - Tau Shooting

The Piranhas move flat out behind the enemy army.  The Tau know that if the Black Templar want to deal with 3 skimmers with fusion blasters, they'll need to halt part of the forward advance to do so.  The Kroot, Battlesuits and Hammerhead fire on the Crusader squads marching toward them through the jungle.  Several were killed.  As a result, due to the Righteous Zeal of the Black Templar, the Marines advance forward yet again.

Although the Kroot are within charge range, they elect not to assault the enemy in close combat.  They know they're likely to lose against such skilled foes, and if the Marines get to assault and win during this turn, they'll immediately have additional movement next turn and another potential assault, with no chance to shoot.  By stalling, they give the Tau fire base a turn to shoot once the Kroot have been wiped out.

Turn 2 - Black Templar Movement


The Black Templar continued the forward march through the jungle.  The Assault Squad decides to double back, using jump packs to close with the enemy Piranhas.  They pass two dangerous terrain tests

Turn 2 - Black Templar Shooting.


The entire front line of each Kroot Squad is killed by bolter fire.

The Predator lands a penetrating hit on the Hammerhead, causing it to explode!  This explosion also killed a Fire Warrior, a Crisis Battlesuit and a Stealth battlesuit, puncturing their armor.  One of the most unlucky vehicle explosions I've ever witnessed!

Turn 2 - Black Templars Charge


The Black Templars do what they love most: charge into close combat with the enemies of the Emperor!

The Assault Squad charged the Piranha squadron, and managed to avoid any wounds from the dangerous Flachette launchers on their hull.  One Crusade squad, led by the Chaplain, fail the charge distance roll, but the second Crusade squad led by the Emperor's Champion is luckier.  They charge ahead and clash with the Kroot.

Turn 2 - Black Templars Assault


As it is their specialty, the Black Templars rarely fail when they assault the enemy.  The Assault Squad, using Melta Bombs, took out the entire Piranha squadron with ease.  The Emperor's Champion led his assault squad against the Kroot, wiping them out without a single casualty.  The Champion alone killed 4 Kroot Hounds.

Turn 2 - Tau Shoting


You can see I skipped the movement phase.  That's because the Tau did as well.  They have nothing to do now but fire as many guns as they can.

Every Tau gun trained itself on the Emperor's Champion and his Crusade Squad, and opened fire.  Three Markerlights hit and marked the target for the rest of the army to fire at an increased Ballistic Skill.  10 Marines were killed, and the Black Templar passed their morale check.  Again, they moved forward with Righteous Zeal, closing the distance with the Fire Warriors.

Turn 3 - Black Templar Movement and Shooting


The Black Templar continue their forward march.  The Assault Squad jumped forward, suffering one casualty from a dangerous terrain test.  The two Crusade Squads moved forward.  A Chaplain controls the relic.

The Kroot lose 5 units from bolter fire, and fail the morale check, falling back.  Meanwhile, the Predator fires on the Crisis suits.  He hits the Shas'el Commander with a lascannon, causing instant death.  Demoralized, the other Crisis suits retreat off the board.

Turn 3 - Black Templar Assault
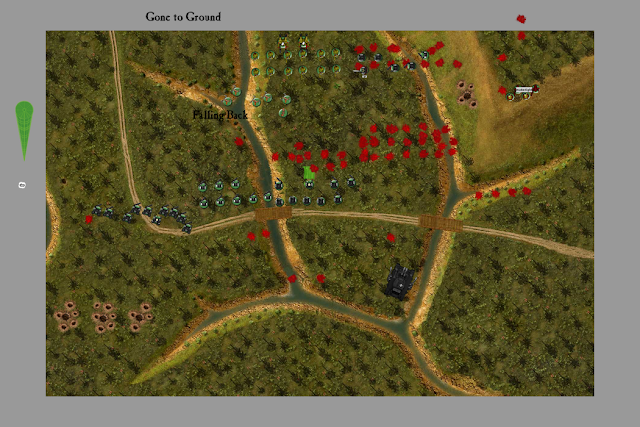

The Emperor's Champion and his Crusade Squad charge the enemy Fire Warriors.  They kill all but two of them, and perform a Sweeping Advance to finish the rest of the unit.

Turn 3 - Tau Movement and Shooting


Once again, the Tau have little choice but to shoot with everything they have.  Firewarriors and Broadsides retreat as much as they can while the Kroot continue to fall back.  The Fire Warriors land 10 shots on the Emperor's Champion, but every one is saved by the armor of himself or a selfless compatriot.  The Broadsides fire both twin-linked railguns, aiming at the Emperor's Champion yet again.  A nearby Initiate jumps in the way and saves the Champion with a Look Out Sir!

Turn 4 - Black Templar Movement


The infantry continue to advance.

Turn 4 - Black Templar Shooting


All squads fire at the Fire Warriors and Kroot, killing many of them.  The Fire Warriors pass their morale checks.

The Predator fires at the Stealth squad, killing two marker drones and causing the squad to fall back.  It retreats off the table and is gone.

Turn 4 - Black Templar Charge


The Emperor's Champion and his Crusade Squad charge into the Fire Warriors in close combat.

Turn 4 - Black Templar Assault


The Emperor's Champion Crusade Squad wipes out the Tau Fire Warriors without much of a fight.

Turn 4 - Tau Shooting


The Broadsides are the only Tau unit left on the board, as the Kroot retreat off the table.  The battlesuits fire both railguns at the Emperor's Champion.  One misses despite being twin-linked, while the other hits but is saved by his Armor of Faith invulnerable save.

Turn 4 - Tau Assault and Turn 5 - Black Templar Movement


The game is rapidly coming to a conclusion, but the Tau has some desperation left.  The surviving Broadsides realize that if they do nothing, they will lose the combat and die in the next turn.  As a last-ditch effort, they charge the Emperor's Champion in assault!  Although strong and tough to kill, Broadsides are very slow, and attack at Initiative step 2.  One was killed before it got a chance to attack by overwatch fire.  The other managed to wound and kill the Emperor's Champion, at last!  At one wound against one wound, the combat is tied and the Broadsides do not retreat, remaining locked in combat.

The remaining Black Templar forces closed in around the dramatic melee, unable to shoot for fear of hitting a comrade.

Turn 5 - Black Templar Charge


The Assault Squad assaults the rear of the Broadside battlesuit, jumping into the combat to assist their fellow Crusaders.

Turn 5 - Black Templar Assault


The Chaplain attached to the Assault Squad dealt the killing blow to the Broadside battlesuit with his Crozius Arcanum (a power axe).

The battle concluded with 4 objectives won by the Black Templar, against 1 of the Tau, and without the Black Templar losing a single unit.

Thursday, August 23, 2012

Warhammer 40k: Through Turn 2

This is a continuation from yesterday's Warhammer 40k Battle Report.  If you haven't read it yet, please skip down to the first Warhammer 40k post.

Movement Phase: Player 2
Here is Player 2's movement phase.  As you can see from the red movement trails, the scouts to the west have chosen to retreat after losing over half their squad.  The Captain and Command Squad have advanced forward down the center.  One Rhino and a Vindicator tank moved down the right side of the table.  Because every crater on this map is difficult terrain, and Vehicles treat all difficult terrain as dangerous terrain, these tanks have to roll a D6 every time they move over a crater.  One Rhino wasn't as lucky as the other, and it is now immobilized after rolling a 1.  The tactical space marine squad on board had to disembark and continue on foot.

Shooting Phase: Player 2
Player 2 had an effective shooting phase!  To the west, the Whirlwind tank unleashed a volley of missiles on the Space Marine squad next to the drop pod.  One was killed, the rest being saved by armor.  The scout squad also opened fire with their sniper rifles, but did no damage.  In the center, one Command Squad Veteran fired his melta gun, scoring a lucky penetrating hit on the Dreadnought.  Its right arm was destroyed, and it reduced to 2 hull points remaining.  Finally, Player 1's scout squad to the east suffered a withering barrage of bolter fire and Demolisher Cannon fire from the nearby tactical marines, Rhino and Vindicator Tank.  Only one scout was killed, though.  Because nothing is in assault range, the assault phase is skipped and we move on to Turn 2.  Also, note that the forgotten marine command squad has arrived at the bottom of the table.

Turn 2: Player 1 - Movement
A lot happened this movement phase!  Before movement even began, Player 1 rolled for reserves and successfully got higher than a 3, dropping his Ironclad Dreadnought to the north.  He also successfully deep-striked his Assault Marine squad, who are able to descend onto the battlefield using jump-packs.  The tactical marines to the west advanced forward, looking to take out the dangerous Whirlwind tank before too much damage could be done.  The marine squad moved through the center in the middle of the table, while the Dreadnought advanced toward the Command Squad and the enemy Captain.  To the east, Player 1's Rhino moved forward while the scout squad re-positioned, looking to find a good distance for their sniper rifles.  The Librarian continued advancing, trying to get within range of the fighting.

Shooting Phase: Player 1
Not the most successful shooting phase for Player 1.  To the west, a hail of boltgun fire from the tactical marines and assault marines killed three scouts, routing the remaining scout as his morale broke.  The two Dreadnoughts, the scouts, and the Razorback - as well as a marine inside with a flamer - all fired onto the hardy Command Squad; not one fell.

Assault Phase: Player 1
Finally, our first Assault Phase!  The Dreadnought has rushed toward the Command Squad and attacked in close combat.  With 3 attacks and a powerful Dreadnought melee weapon, it managed to crush one of the enemy Veterans, but only one.  The enemy was unable to do any damage to the Dreadnought's thick hull.  Although Player 1 had the option to retreat his squad and automatically fail the morale check (using the Combat Tactics special rule allotted to Space Marines), he chose to continue the combat into the next turn.

Movement Phase: Player 2
Player 2 continues his sweeping advance.  To the west, he has managed to deploy a reserve force of Assault Marines, deep-striking onto the battlefield.  Behind them, the Whirlwind tank has been retreating from the dangerous force of tactical marines advancing on it.  In doing so, it ran over a trench, becoming immobilized (it rolled a 1 on a dangerous terrain test).  The lone remaining scout has regrouped, moving around the bunker to gain line of sight with the enemy Ironclad Dreadnought.  Also note that the formerly-immobilized Rhino to the east has repaired itself, as Rhinos are able to do, by rolling a very lucky 6.  Finally, All the space marines advanced down the eastern field, looking to assault the hapless scouts there.

Shooting Phase: Player 2
A very successful shooting phase indeed!  The Whirlwind to the west is the hero of the day, with a good barrage of missiles killing two enemy marines and causing them to retreat.  To the east, a Melta Gun marine has managed to destroy the heavy bolters on the enemy Razorback.  Other shots were taken but ultimately missed or deflected by armor.  

Assault Phase: Player 2
An Assault Phase did occur this turn, but I have no screenshot of it.  We'll see the result next turn, but briefly, the Dreadnought killed one Command Squad Veteren (the valuable Apothacary!), before the Space Marine Captain planted a melta bomb onto the Dreadnought, wrecking it completely.

Wednesday, August 22, 2012

Warhammer 40k - A Sample Game

I'm learning how to play Warhammer 40k.  It's a brilliant strategy game with some awesome backstory and literature.  I'm recording every turn and most specific actions during my current game, in order to share it with you, the reader!

My plan is to have two paragraphs accompany every screenshot: The first will explain what's happening in respect to the game, rules and strategy of Warhammer 40k the game; the second will narrate the battle itself, like a story, from a 3rd person omniscient perspective.  Hope you enjoy!


 Deployment.
Before a game can begin, there are a few steps to take.  The first is selecting the mission parameters.  For the purposes of simplicity and learning, I chose the simplest mission: "Purge the Alien."  In this mission, you gain Victory Points for destroying entire units of the enemy (single models don't count).  Once the mission is selected (or rolled for), it's time to deploy the troops.  In this game, each side (hereafter referred to as Player 1 and Player 2) elected to keep some troops in reserve to Deep Strike onto the battlefield on later turns.  Player 1 had several drop pods for a Drop Pod Assault, as we'll see soon.  The units that can go onto the battlefield deploy in the green deployment zones on the player's side of the table.  The table itself affords a lot of cover and difficult terrain, making it difficult for most vehicles.  It includes buildings, trenches and craters, all of which can be used for cover.  For simplicity I will probably ignore buildings in this game, treating them as impassible terrain.  Ordinarily you can enter buildings.


Player 1 is deploying first, after player 2 won the roll-off but decided to go second on purpose.  Player 1 has deployed his Warmaster, The Librarian, behind the cover of buildings on the east.  The Librarian is a powerful Psyker with strong spells.  Alongside the Librarian is a Razorback transport, carrying a 5-marine tactical combat squad.  Player 1 has split up his 10-marine tactical squad into two 5-man combat squads before deployment; a special ability of the space marines.  The Razorback is a transport emphasizing firepower at the cost of reduced infantry capacity, perfect for a smaller combat squad.  Player 1 elected to deploy to the east because of the drop pod assault that is coming shortly; the west provided too many open spaces, and he wants a close and dirty assault.  Note that Player 1 has made a mistake here: he has one combat squad of 5 tactical marines that did not deploy, and must.  He'll correct that later, but for now consider them in reserves too (although this violates the rules).

Deployment is now complete.  Player 2 deployed two fully loaded Rhino transports with 10-marine tactical squads in each to the northeast.  In the far east corner is a Vindicator tank, armed with a powerful demolisher cannon hoping to deal lots of damage as Player 1's army advances.  Next to the Rhinos stands the Space Marine Captain and his unit of Command Squad veterans.  He elected to begin the game attached to their unit.  The Captain is a strong hero character with an Iron Halo, conferring a 4+ invulnerable save, and equipped with lightning claws and melta bombs, making him formidable in close combat against any adversary.  He can also be wounded 3 times before dying, keeping him alive far longer than normal infantry.  The Command Squad he has joined is fairly normal infantry, with strong close combat weapons and an Apothacary attached to the unit.  The Apothacary is a medic, granting a "feel no pain" bonus which can save soldiers from wounds on a roll of 5 or higher.  On the left side of the battlefield, Player 2 has deployed a Whirlwind tank, a long range barrage ordnance unit designed to deal massive splash damage to infantry.

Finally, after normal deployment, each army contains a squad of scout marines.  These troops have the "infiltrate" special rule, which allows them to deploy after the main armies, and anyplace on the battlefield out of range or sight of the enemy.  You'll see Player 1's scout squad behind a building in the center, while Player 2's scouts have deployed to the west to defend the Whirlwind.

Turn 1: Player 1
Before the movement phase, Player 1 gets to deploy his drop pod reserves in a special move called a "Drop Pod Assault".  One half of the drop pods in his army automatically deep strike onto the battlefield at the beginning of turn 1, rather than later on in the game.  Because Player 1 created his army with 3 drop pods, and he gets to round up when he takes half his drop pods, he actually gets 2 out of his 3 drop pods on turn one (1/2 of 3 is 1.5, which rounds up to 2!)  He dropped a squad of tactical marines on the western edge of the board, hoping to catch the Whirlwind and scout squad in close range and quickly annihilate them.  He dropped his dreadnought into the middle of the battlefield, letting it take the spearhead of the frontal assault.  These units can move and shoot after disembarking from their drop pods, but they can not assault this turn.

Movement Phase: Player 1
The first phase of a turn is the Movement Phase.  The default movement distance of each unit is six inches during this phase.  Note that the tactical marines to the west retreated a bit, using the drop pod as cover, because they want to avoid an assault right now without the advantage of charging.  The scout squad to the east moved around the building to take aim at the enemy Command Squad with their sniper rifles.  Player 1's Razorback also advanced, but at cruising speed, traveling 12 inches.  Because of its high speed, the Razorback's fire will be wildly inaccurate if it chooses to shoot.  Player 1 wants to get that Razorback into the enemy's face quickly, because one space marine embarked on it has a flamer, which could do serious damage in close range.  Finally, the Librarian has moved up, but at the back of the army he won't be able to do much at this point.

Shooting Phase: Player 1
To start the shooting phase, we'll step through a few individual units as they fire at the enemy.  To begin with, the tactical marines to the west have opened fire on the enemy scout squad.  To shoot at the enemy, they first had to check their range.  Within 12 inches, the marines can fire a single round from a bolt pistol or two rounds from the rapid-fire boltgun.  Between 12 and 24 inches away, the marines can only fire a single shot, and only from their boltguns.  Once figuring out exactly how many shots the unit of space marines can fire at the unit of scouts, we need to work out how many shots actually hit.  Player 1 took a die for each shot fired and rolled.  Because the space marines have a Ballistic Skill of 4, we get a hit on rolls of 3 or higher (the trick is to subtract the Ballistic Skill from 7 to get this number. a BS of 3 would be a 4+ to hit, etc).  Once determining how many shots actually hit their targets, Player 1 then rolls to determine whether the shots cause any wounds.  This is done by comparing the Strength of the attacking weapon with the Toughness of the target.  Equal values yield a dice roll of 4 or higher to wound.  If Strength is one higher than Toughness (e.g., S 5 vs T 4) then the dice roll needs a 3+ to wound.  If Strength is two higher, or more, than Toughness, only a 2+ is needed to wound.  And the opposite is true: if Toughness is higher than Strength, you might need a 5+ or even a 6+ to wound particularly hardy targets.  At this point, the tactical marines have a group of wounds pooled up against the scouts.  The last thing to do is determine any saves.  The scouts have weak Carapace Armor, so they get an armor save on a 4 or higher for every wound in the wound pool.  As you can see, a total of six scouts were killed by bolter fire - a particularly lucky roll for the space marines!


Next, the Dreadnought in the center of the map fired on the enemy Command Squad.  A Dreadnought has two arms with a weapon mounted on each: a Storm Bolter, a bolter assault rifle capable of firing twice at any enemy within range; and a multi-melta, a medium-range weapon that melts anything in its path and is particularly effective against armor.  Unfortunately for Player 1, all three attacks missed, doing nothing.


Finally, the Razorback and the scout squad fired at the enemy.  The Razorback moved at cruise speed, so it can only fire "snap shots", which require a 6 to be rolled to hit.  Predictably, all three shots from its Heavy Bolter missed wide.  The scouts fired their sniper rifles, but with a Ballistic Skill of 3, they require a 4 or better to hit.  Only a handful of shots landed, and none made it through the Combat Squad's strong Power Armor, failing the 4+ To Wound rolls.  As no units are in position to charge into close combat, the end of Player 1's shooting phase also signals the end of his turn completely.  Next, we'll progress to Player 2's movement phase.  Stay tuned!

Friday, August 10, 2012

An example of range variance in poker.


BB is a 50/31 fish with 57% bet.  He loves these little min donk bets.

MP is a 27/20 donk with 14% 3 bet pre, 24% 4 bet, 16% flop raise, 25% flop check raise.  He's aggro as fuck.  He folds to 3 bets pre 57%, which isn't a lot.  He raises any draw on the flop.  We'll be seeing him more later in this blog post, stay tuned!

Merge - $0.04 NL (6 max) - Holdem - 6 players
Hand converted by PokerTracker 3: http://www.pokertracker.com

UTG: $6.14
MP: $8.66
CO: $3.71
Hero (BTN): $4.00
SB: $5.24
BB: $1.61

SB posts SB $0.02, BB posts BB $0.04

Pre Flop: ($0.06) Hero has Ah Kh

fold, MP raises to $0.14, fold, Hero calls $0.14, fold, BB calls $0.10
I elect to flat him here for balance and deception.  I had just 3 bet him with AA in a hand you'll see next, and I didn't feel like calling a shove with AK since he shoves at least JJ+ if not TT+ as well as AK+ (but not AQ, he flats with that hand).  So against that range I don't feel like I'm in the best shape, and I'd rather keep his worse aces in.  He's also so aggressive that if I miss with AK in a 3 bet pot I'll have lost a lot more and he's likely to attack every single pot in existence.  and if I hit, I get payed off huge for sure.  This might have been a mistake but I don't think a huge one.

Flop: ($0.44, 3 players) 5s Jh Qs
BB bets $0.04, MP raises to $0.43, Hero raises to $3.86 and is all-in, fold, MP calls $3.43
BB donk min bets, which means absolutely zilch.  MP raises, which also means very little.  He raises every single draw, so every flush draw in his range, every gutshot, every open ender, every Q.  Against a Q, I have 40% equity, and against his range total I felt like I was a favorite, including fold equity.  He wouldn't likely call me with his draws, only probably a Q or better, so a lot folds.

Turn: ($8.20, 2 players) 2d

River: ($8.20, 2 players) Ac

MP shows Qd Jd (Two Pair, Queens and Jacks) (Pre 37%, Flop 78%, Turn 91%)
Hero shows Ah Kh (One Pair, Aces) (Pre 63%, Flop 22%, Turn 9%)
MP wins $7.79

Here's the math:

Text results appended to pokerstove.txt

 101,970  games     0.005 secs    20,394,000  games/sec

Board: Qs Jh 5s
Dead:  

equity  win  tie        pots won  pots tied
Hand 0:  43.269%   38.89%  04.37%           39661       4460.50   { AhKh }
Hand 1:  56.731%   52.36%  04.37%           53388       4460.50   { JJ+, 55, AQs+, AsJs, ATs, As9s, As8s, As7s, As6s, As5s, As4s, As3s, KQs, KsJs, KTs, Q9s+, JsTs, T9s, AQo+, ATo, KQo, KTo, QTo+ }


This includes only those suited combos with a flush draw, so not all KJs, only KJ of spades.  For gutshots and OESD's it includes all suits, since he raises any draw at all.  These hands were all in his preflop raise range.  This range is 12.1% of hands.  When I shove, I expect to only get called by AA, KK, AQ, KQ, QQ, JJ, QJ.  With blockers factored in, that's 4.4%, or approx 1 out of 2.75 of his hands call me while the rest fold out.  Around 2/3 of his range folds to my raise.  Against his calling range, I have 24.8% equity.

Text results appended to pokerstove.txt

  43,560  games     0.002 secs    21,780,000  games/sec

Board: Qs Jh 5s
Dead:  

equity  win  tie        pots won  pots tied
Hand 0:  24.821%   24.49%  00.34%           10666        146.00   { AhKh }
Hand 1:  75.179%   74.84%  00.34%           32602        146.00   { AcAd, AcAs, AdAs, KcKd, KcKs, KdKs, QQ-JJ, 55, AcQc, AdQd, AsQs, AsJs, AsTs, KsQs, KsJs, QJs, JsTs, AQo, KQo, QJo }

I think you can see this is a clearly +ev move.  So, I ran into the premium part of his range.


Same villain.  Copy+Paste:  MP is a 27/20 donk with 14% 3 bet pre, 24% 4 bet, 16% flop raise, 25% flop check raise.  He's aggro as fuck.  He folds to 3 bets pre 57%, which isn't a lot.  He raises any draw on the flop.  This hand was maybe 5 minutes prior to the above.

Merge - $0.04 NL (6 max) - Holdem - 5 players
Hand converted by PokerTracker 3: http://www.pokertracker.com

BB: $4.34
UTG: $4.00
CO: $3.18
Hero (BTN): $5.14
SB: $4.28

SB posts SB $0.02, BB posts BB $0.04

Pre Flop: ($0.06) Hero has As Ac

UTG raises to $0.14, fold, Hero raises to $0.28, fold, fold, UTG calls $0.14
He's so aggressive pre, I am begging him to 4 bet or shove me here.  Unfortunately he just calls.

Flop: ($0.62, 2 players) Jc Jd Kd
UTG checks, Hero bets $0.41, UTG raises to $1.37, Hero calls $0.96
He's raising any K, any J, and any draw here.  Since he flatted my 3 bet, his continuing range after a 3-bet is 11.4%, but some of that range 4 bets, so in reality his flatting range is something like 8.6%.  ATs+, ATo+, KTs+, KQo+, QTs+, 77+ according to pokerstove.  We can probably adjust a few things to make it more realistic like taking out 77-88, ATo and A9s and adding in KJo and QJo, but this seems pretty reasonable.

Villain raises every draw and every top pair+.  Which is 7.1% of hands, or 0.84% of the hands in his range.  So he's raising me here over 4/5 times.  I'm a 50% favorite against this range according to pokerstove, we'll see the math a little later.  However, I figured if I ship it, he lays down all his draws and only calls me with a J, maybe a K, but he might even lay down a K.  This is still probably the most +ev way to play it, but I know he's aggressive and he's going to barrel basically every turn card.

Turn: ($3.36, 2 players) Ts
UTG bets $1.68, Hero calls $1.68
Given my knowledge about his range, I have to call this.  I'm getting 3:1 and I know he barrels 100% of his range here basically.  According to pokerstove I have 37% equity against his range here, which is certainly +ev.

River: ($6.72, 2 players) Kc
UTG checks, Hero checks
If he had a K, it got there.  My equity on the river against his range is 5%.  This seems like a clear check-back.  Although, if he had a K, he'd bet this river, so I have a chance to steal it by shoving, since he probably thinks I have a full house.  At the time this didn't really occur to me - I just thought he was probably done bluffing and he folds all worse always, so why bet? 

UTG shows Ad Qs (Straight, Ace High) (Pre 7%, Flop 19%, Turn 90%)
Hero shows As Ac (Two Pair, Aces and Kings) (Pre 93%, Flop 81%, Turn 10%)
UTG wins $6.39
... yeah.


  42,570  games     0.001 secs    42,570,000  games/sec

Board: Jc Kd Jd
Dead:  

equity  win  tie        pots won  pots tied
Hand 0:  52.221%   52.01%  00.21%           22139         91.50   { AcAs }
Hand 1:  47.779%   47.56%  00.21%           20248         91.50   { AQs-ATs, KTs+, QJs, AQo-AJo, KJo+, QJo }

   1,848  games     0.001 secs     1,848,000  games/sec

Board: Jc Kd Jd Ts
Dead:  

equity  win  tie        pots won  pots tied
Hand 0:  36.986%   35.71%  01.27%             660         23.50   { AcAs }
Hand 1:  63.014%   61.74%  01.27%            1141         23.50   { AQs-ATs, KTs+, QJs, AQo-AJo, KJo+, QJo }


---

 35  games     0.001 secs    35,000  games/sec

Board: Jc Kd Jd Ts Kc
Dead:  

equity  win  tie        pots won  pots tied
Hand 0:  05.714%   05.71%  00.00%               2          0.00   { AcAs }
Hand 1:  94.286%   94.29%  00.00%              33          0.00   { AQs-ATs, KTs+, QJs, AQo-AJo, KJo+, QJo }


No doubt both hands were +ev, although they might not be the most +ev lines to take.


And we'll end with a bit of variance:

Merge - $0.04 NL (6 max) - Holdem - 6 players
Hand converted by PokerTracker 3: http://www.pokertracker.com

BTN: $4.30
SB: $5.59
BB: $1.29
Hero (UTG): $4.24
MP: $4.10
CO: $4.00

SB posts SB $0.02, BB posts BB $0.04

Pre Flop: ($0.06) Hero has Ks Ad

Hero raises to $0.14, MP calls $0.14, fold, BTN calls $0.14, fold, BB raises to $0.32, Hero raises to $1.38, fold, fold, BB calls $0.97 and is all-in

Flop: ($2.88, 2 players) 4s Qd 4d

Turn: ($2.88, 2 players) 3s

River: ($2.88, 2 players) Qs

BB shows Qh Qc (Four of a Kind, Queens) (Pre 57%, Flop 99%, Turn 100%)
Hero shows Ks Ad (Two Pair, Queens and Fours) (Pre 43%, Flop 1%, Turn 0%)
BB wins $2.74


And a little positive variance early on:

Merge - $0.04 NL (6 max) - Holdem - 6 players
Hand converted by PokerTracker 3: http://www.pokertracker.com

CO: $4.16
BTN: $5.57
SB: $2.74
Hero (BB): $4.00
UTG: $4.00
MP: $4.00

SB posts SB $0.02, Hero posts BB $0.04

Pre Flop: ($0.06) Hero has Jc Kh

fold, fold, fold, BTN raises to $0.08, SB calls $0.06, Hero calls $0.04

Flop: ($0.24, 3 players) Ad Ts 2c
SB checks, Hero bets $0.12, BTN calls $0.12, SB calls $0.12

Turn: ($0.60, 3 players) Qc
SB checks, Hero bets $0.36, BTN calls $0.36, SB calls $0.36

River: ($1.68, 3 players) 5d
SB checks, Hero bets $0.99, BTN calls $0.99, fold

Hero shows Jc Kh (Straight, Ace High) (Pre 26%, Flop 17%, Turn 97%)
BTN shows Kd As (One Pair, Aces) (Pre 74%, Flop 83%, Turn 3%)
Hero wins $3.48


Got AA once and lost.  Got AKs once and lost.  Got AKo twice, won once.  Got KQo twice, got 3 bet both times from MP (same guy) and had to fold.  Those were his only 3 bets.  Not the best session, haha

Wednesday, August 1, 2012

Let's talk Poker!

I know, I'm straying so far from "general video games blog" with my focus on Starcraft and then talking about Poker.  But I think that there's so much overlap and similarity between all games that I think you'll want to read about this too.  And besides, this is my blog, and this is what I want to write about.  I hope you want to read about it.

I'm going to post some sample Texas Hold'em hands that I've played online, against real people, for real money.  The monetary values in the hands are real.  "Hero" to me, the other labels refer to the position of the opponents around the table.  "SB" means small blind, "BB" means big blind, etc.  Cards are labeled by the face value of the card, followed by the suit.  So "Ac" means the Ace of Clubs.  "6d" means the 6 of diamonds.  When I mention stats like "25/20" or "40/40", the first number refers to the "vpip", or "volume put in pot".  It's a statistic of how often the player calls bets without raising.  The second number refers to "preflop raise", or the % of times the player has raised before the flop.  The ratio of these numbers can often tell you a player's general tendencies, along with a lot of other information.  A player with a high pfr is a loose aggressive player.  A player with a very low pfr is very tight when he or she raises and has a strong hand often.  If you need clarification about anything else, please ask!  Also included is my commentary for each hand.


No stats on this villain, 5th hand of the session.  He had a $10 stack though, so I assumed he was a pretty good reg.  From the 2 revolutions I had observed, he seemed pretty good, got involved only in good spots and usually won the pots he got involved with.

Merge - $0.04 NL (6 max) - Holdem - 6 players
Hand converted by PokerTracker 3: http://www.pokertracker.com

Hero (UTG): $4.06
MP: $4.00
CO: $6.23
BTN: $6.61
SB: $4.31
BB: $9.60

SB posts SB $0.02, BB posts BB $0.04

Pre Flop: ($0.06) Hero has Ac 9c

Hero raises to $0.14, fold, fold, fold, fold, BB calls $0.10

Flop: ($0.30, 2 players) 8h Qh 9d
BB checks, Hero checks
I could have c-bet here to get value from draws, but I felt at the time that this board hits his range really hard, and if he's a good player it's going to be very tough to win the pot by c-betting and following up.  A good player is also raising draws sometimes.  And he was mostly unknown.  I just felt like taking a safer and more passive line at the time.  Think I should have c-bet?

Turn: ($0.30, 2 players) 2d
BB bets $0.25, Hero calls $0.25
I thought he bets here a TON; all of his air bluffs here after I checked flop.  All his draws bet here, plus his queens.  So I have good enough equity to call against that wide range.

River: ($0.80, 2 players) 2s
BB bets $0.60, Hero raises to $3.67 and is all-in
I tanked for a very long time after he bet river.  At this point, I thought that he could have a queen.  But I also thought that if he's a good player, my hand seems kind of face-up.  Middle pair or a draw type hand that missed completely.  He knows for a fact I don't have top pair or I'd c-bet the flop, but I called the turn, so I have a middle strength hand, meaning he can blow me off it with a river bet.  Given this, I think that I don't want to fold.  But what do I do?  If I call, he's probably like 50:50 between queens and bluffs, and while it's +ev it might not be the most +ev.  I contemplated raising, and thought that given the action so far I can very credibly rep a monster that I was slow playing, like JT (almost exactly JT, most other monsters value bet flop because of the draws).  But if I min raise or raise 3x, I think he calls sometimes with his queens, although it's hard to say.  My fold equity isn't great against something like KQ.  He can assume I have a missed draw often enough to call, potentially.  So I don't think a standard raise is going to do the job.  But a shove is consistent with what I represent, and I think he folds his queens very often because at these limits, an unknown shoving you on the river is always the nuts.  You'd fold to this line, no doubt, to an unknown player.  So would I.  So I think the shove is the most +ev decision and I went with it.

(he tanked) fold, Hero wins $1.90


Villain was 44/40, super aggressive super loose player but generally a winning one.  Pretty standard spot, he was calling and c/f a lot of flops to my 3 bets.

Merge - $0.04 NL (6 max) - Holdem - 6 players
Hand converted by PokerTracker 3: http://www.pokertracker.com

Hero (BTN): $6.81
SB: $4.67
BB: $2.05
UTG: $8.08
MP: $4.00
CO: $10.75

SB posts SB $0.02, BB posts BB $0.04

Pre Flop: ($0.06) Hero has 6s As

UTG raises to $0.12, fold, fold, Hero raises to $0.34, fold, fold, UTG calls $0.22

Flop: ($0.74, 2 players) 9d 5c Ac
UTG checks, Hero bets $0.55, fold

Hero wins $0.71


Same Villain, he's super LAG.

Merge - $0.04 NL (6 max) - Holdem - 5 players
Hand converted by PokerTracker 3: http://www.pokertracker.com

Hero (BB): $4.99
UTG: $4.39
CO: $5.93
BTN: $4.54
SB: $10.91

SB posts SB $0.02, Hero posts BB $0.04

Pre Flop: ($0.06) Hero has Th Td

fold, fold, BTN raises to $0.10, fold, Hero raises to $0.32, BTN raises to $0.88, Hero calls $0.56
The 3 bet is a no brainer.  But he 4 bet me, first time at the table he's done that.  However, it's also a pretty small amount.  Almost universally people 4 bet to $1 in my experience.  I thought he could be light here, and I also just had great pot odds.  I really wanted to jam, but I felt his calling range was still going to be fairly strong, and I knew I could outplay the guy postflop.  It felt gross but I flatted.  

Flop: ($1.78, 2 players) Kc 2c 8h
Hero checks, BTN bets $1.01, Hero calls $1.01
Given his stats, I can't fold here, I think.  Very dry flop, he c bets almost every flop, I can't immediately assume he has AK.

Turn: ($3.80, 2 players) Qc
Hero checks, BTN checks
I'd have folded if he bet here.

River: ($3.80, 2 players) 8s
Hero checks, BTN checks

Hero shows Th Td (Two Pair, Tens and Eights) (Pre 84%, Flop 95%, Turn 100%)
BTN shows 4s 6d (One Pair, Eights) (Pre 16%, Flop 5%, Turn 0%)
Hero wins $3.61


This hand is kind of ridiculous.  Gotta love micro players.  A 3 bet pot AND it's multiway, this is as fit-or-fold as it gets!

Merge - $0.04 NL (6 max) - Holdem - 6 players
Hand converted by PokerTracker 3: http://www.pokertracker.com

Hero (UTG): $7.18
MP: $4.85
CO: $1.90
BTN: $7.68
SB: $4.00
BB: $10.75

SB posts SB $0.02, BB posts BB $0.04

Pre Flop: ($0.06) Hero has 2d 2s

Hero raises to $0.10, MP calls $0.10, fold, fold, SB raises to $0.32, BB calls $0.28, Hero calls $0.22, MP calls $0.22
Note the stack sizes and the pot odds and you'll see why I called.  If BB had folded I would have.

Flop: ($1.28, 4 players) Kc 4c 3d
SB checks, BB checks, Hero checks, MP checks
Obvious check-fold 4 way on this flop.  Except nobody bet!

Turn: ($1.28, 4 players) 7d
SB checks, BB checks, Hero bets $0.64, fold, fold, fold
After it checks through on the flop, I figure this 7 hits nobody's ranges and if they didn't have a K before, they're folding for sure here.  And 4 way, why would you check something like AK or KQ on that flop?  Only needed to risk half pot to get the job done.

Hero wins $1.22


For a change, here's a hand I lost.  Same super LAG villain, I know he's very loose and raise-happy.

Merge - $0.04 NL (6 max) - Holdem - 5 players
Hand converted by PokerTracker 3: http://www.pokertracker.com

Hero (UTG): $6.55
CO: $4.72
BTN: $7.13
SB: $3.78
BB: $10.89

SB posts SB $0.02, BB posts BB $0.04

Pre Flop: ($0.06) Hero has 9d 9h

Hero raises to $0.14, fold, BTN raises to $0.40, fold, fold, Hero calls $0.26
Again this felt gross.  But we were both playing back against the other lately, and I felt like if I 4 bet he'd 5 bet very often.  But I hate to just fold 99 against him.  Are we deep enough for me to set mine here?

Flop: ($0.86, 2 players) Td Jc As
Hero checks, BTN bets $0.57, fold
Yeah I might have the best hand on this flop, but it just felt like such a shitty spot, I have an underpair to the board, it's ALL broadways, he could easily have a lot of gutshots with K's and Q's that I have little fold equity against and that have great equity against me.  And I can't really stand up to any pressure after the flop.  So with little fold equity and no good plan to make it to showdown with what MIGHT be the best hand, I figured fold was the best plan.

BTN wins $0.82


Hand reading :) Villain was 40/0 over 50 hands. Look for spots like this where you can get value, you might be missing some.

Merge - $0.04 NL (6 max) - Holdem - 5 players
Hand converted by PokerTracker 3: http://www.pokertracker.com

SB: $4.20
BB: $1.20
UTG: $4.16
CO: $2.29
Hero (BTN): $3.98

SB posts SB $0.02, BB posts BB $0.04

Pre Flop: ($0.06) Hero has 2c Kc

fold, CO calls $0.04, Hero raises to $0.16, fold, fold, CO calls $0.12
I raise here because this guy limped in and I want to take the dead money in the pot.

Flop: ($0.38, 2 players) Ac Td 3d
CO bets $0.19, Hero raises to $0.57, fold
He leads into me for half pot.  He limped, so I don't believe he has an A - I think he'd raise an A.  I also don't think he'd be too afraid to check flop and either check raise or lead turn, considering I raised him before the flop, if he did have an A.  Leading here indicates either a monster like a set, or a bluff, and I think it looks way more like a bluff.  So I raise him.  He folded and showed me a ten.

Hero wins $0.73


Villain was 17/17 over 6 hands, no real reads in the blinds.  Decided the standard villain is light enough here, and I have ace blocker, that I can 4-bet bluff him here profitably without reads.

Merge - $0.04 NL (6 max) - Holdem - 5 players
Hand converted by PokerTracker 3: http://www.pokertracker.com

BB: $3.96
UTG: $1.26
CO: $4.00
BTN: $2.34
Hero (SB): $4.06

Hero posts SB $0.02, BB posts BB $0.04

Pre Flop: ($0.06) Hero has Ad Qh

fold, fold, fold, Hero raises to $0.08, BB raises to $0.24, Hero raises to $0.56, fold

Hero wins $0.48